Friends, today we are so fortunate to have Alma Partida, my grad school classmate, owner/manager of AAC For You and Me, and fellow SLP, on the blog today. She is going to walk us through, step-by-step, how to make a core board. Core boards are a form of low-tech AAC that includes core vocabulary for a given activity. SLPs use this in many settings, but parents, take note! It can easily be used at home.
Take it away, Alma!
——
Hello! My name is Alma and I am speech-language pathologist in sunny California Tami and I attended San Jose State together, class of 2017, woot woot!
I am a school-based SLP with a focus on AAC. I run an Instagram page called AAC For You And Me, where I share resources on all things AAC, how it works for everyone and a little on bilingual AAC.
——
CORE BOARD IN SIX EASY STEPS!!
Follow along on YouTube: Core Board in Six Easy Steps!
My guest post today will be on everyone’s favorite subject: CORE BOARDS!!
Core boards are the perfect way to model language for students. They help teach pronouns, verbs, adjectives and can help with increasing mean length of utterance (MLU).
MATERIALS:
 .
. 
-Large piece of felt (available at your local Michael’s or other craft store)
-Laminator
-Color printer
-Velcro (long roll) –cheaper at your local craft store.
-Velcro dots– cheaper on Amazon
SO WHERE DO I START?
-
The first step is select your vocabulary. This will be different for every classroom as experiences vary in terms of student’s exposure to AAC. There are tons of free core boards around. Another option is to just print out a large version of a commonly used home page of your favorite AAC app.
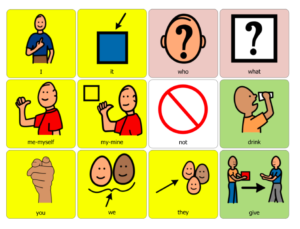
To not reinvent the wheel, if a lot of your students are comfortable with PCS symbols (Boardmaker), you can download the following PDF. It was made by a classmate of ours, Jacquelyn Fortner, who kindly shared the vocabulary with us.
-
Vocabulary Set 1 (download, print and laminate two copies of this!)
-
Vocabulary Set 2 (download and print one copy of this, to help guide you)
2. The second step is laminate!! Some SLPs use their own laminators to create icons which frankly makes them sturdier. However, if you are okay with flimsy-ish icons, go ahead and use one of those monster-large laminators from your school. If your school doesn’t have one, check your district office. Reminder: print and laminate two copies of the PDF with the vocabulary. Only one will be cut into icons, which is in the next step 🙂
3. The third step is cut out the icons! If you are a school-based SLP you can do this pool-side during the summer, like I did ?Very relaxing. Or if you can persuade your boyfriend into helping you, do that.
4. The fourth step is arranging the large set of words onto the felt board and hot gluing that second set down. This step is pretty self explanatory and it helps if you use the PDF of the vocabulary as a guide.
5. The fifth step is glue the horizontal piece of velcro onto the felt. This is your sentence strip where words will be placed.
6. The final step is adding the sticky dot velcro to the back of icons . Once you have added the velcro to icons, add it to the set of larger words already glued to the felt board.
TA-DA!! You have a CORE BOARD. It is on a piece of felt which will make it very easy to clip on to various areas of the classroom so you can model, model, model. You can add it to a trifold to have a sturdy holding area. You can print out the “guide” in color and make a smaller core board to model in a small table setting. The possibilities are endless…happy modeling!
—–
About the Guest Blogger:
Alma M. Partida, MA, CCC-SLP, is a school-based SLP with a focus on AAC. She has experience in the outpatient setting where she has assessed multiple clients of all ages for speech-generating devices. She currently works in the school setting with grades kinder-2nd focusing on literacy and AAC with bilingual and ELL students.
Follow her on Instagram, Twitter and Youtube: @AACforYouAndMe.
